Review Summary
The reviews highlight a strong appreciation for the kit's value, quality components, and iconic design, with many noting the high-quality balsa fins, detailed tail cone, and overall durability despite some construction challenges. Builders often mention the need for extra care during assembly, particularly with fin alignment, fitting to the plastic tail cone, and painting the complex curves, while some suggest upgrades like Kevlar shock cords and epoxy for stronger bonds. Flights are generally described as stable and visually impressive, though a few users encountered issues with recovery systems and engine mounts that required modifications for optimal performance.
Great kit for experienced builders
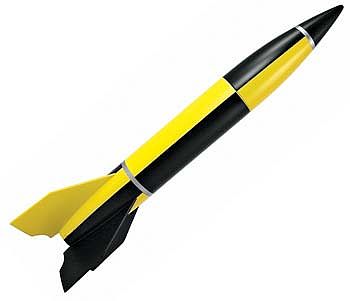
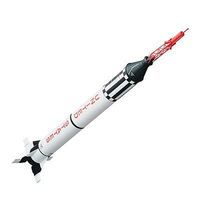
Overall, this is an excellent offering from Estes. It's definitely the best value for money in a V2 kit in this size range, with the only other offering I could find being the U.S. Rockets kit at around $60. The parts are standard Estes - molded plastic nose cone and boat tail, thin wall body tubing, heavier duty 24mm motor mount tubing, and laser-cut paper centering rings and balsa fins. The fin stock in my kit was excellent - no bows and a nice tight grain.
Building the kit, there are several areas where extra care must be taken. The fins are mounted through the boat tail to the motor mount, which makes for a strong bond. However, the slots in the boat tail are NOT pre-cut. Since they are actually a molded hump on the outside of the boat tail that has to be cut out by the builder, they wind up being wider than the fin stock, and slightly shorter than the tab on the fin. This results in some minor difficulty getting the fins on and aligned properly, as the laser-cut paper fin alignment fixture did not in any way line up correctly on my kit. What I did was tack each fin in place through the boat tail to the motor tube with thin CA, taking care to get it on straight, then dribble a small amount of 5-min epoxy down each side to the motor tube, tilting the whole assembly to get it to make a nice small fillet to the motor mount. Although this definitely took extra time, it was worth it for the peace of mind. The gap between the edges of the slot in the boat tail and the fin was easily filled with thickened epoxy. Just remember to rough up the boat tail with some 60 grit sandpaper for good epoxy adhesion.
Aside from the slight challenges related to the boat tail, this kit went together really nicely. All the other parts fit nicely, and for a sport-scale kit it includes some nice molded detail on the boat tail. The kit comes with some clay nose weight, but after getting the kit together and painted and into Rocksim, I wound up adding 1.1oz of nose weight to get it stable on Aerotech 24/40 reloads. I also added a spare 24 Nylon chute I had laying around.
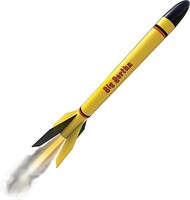
The first flight was on an Estes D12-5 (NOT the recommended D12-3), chosen after simulating both the -3 and -5 in Rocksim. The 5 second delay wound up being perfect, popping the top right at apogee for a gentle landing. Overall, a great kit, especially for the price, and definitely a looker on the pad.
Scale project at a sport price!
I have just un-boxed my V-2 and I am excited by the possibilities! I originally intended to do my usual - sort of follow the directions, upgrade to a larger motor mount, etc. but now that I see the unusually detailed fin area and the other cool details I have decided to try a scale project. The stock paint job is cool but searching online reveals a ton of options for cool finishes. I am looking forward to building this bad boy!
Nice model of an iconic rocket
After buying the Estes V2 as a gift for someone else I decided I had to have one myself. When the kit arrived I was pleased by the quality of the parts, particularly the fins. Hard, straight balsa with not a twist or warp to be found. The tail cone was perfectly molded with a minimum of seam scraping needed. The nosecone had a bit of a wider seam that needed filling and sanding to fix. The rest of the parts were of typically high Estes quality.
Construction of this kit differs from the average Estes kit because of the need to glue wood and cardboard parts to the plastic tail cone. In addition to wood glue you will need to use medium or thick CA. You will also need to fit the fins for a good glue joint with the tail cone. All other construction will be familiar to anyone who's built an Estes kit before.
Painting the rocket is the hardest part of the entire build process. Masking the compound curves of the nose and tail cones takes patience and a good quality masking tape that can fit to the curves. It's very much worth the work involved, though, because once the paint is done it's a very sharp looking rocket!
Overall I'm very satisfied with this kit. I would hesitate to give it to someone as a first kit, it would be much better left until at least a couple of others have been completed.


