I built this for IPMS a few years ago and really enjoyed it. He is my review:
Dragon has released their 10th StuG III Ausf.G kit with a production model with the very specific timeframe for December, 1943. The kit contains 15 sprues, one brass photo-etched sheet, two nickel-etched side skirts (schurtzen), two bags of magic tracks, one sprue of clear parts, braided tow cable wire, and a small Cartograf decal sheet. This being a Smart Kit, we get these PE and nickel extras, but no turned metal gun barrel.
Construction begins with the lower hull and suspension. The road wheels, sprockets, idlers, and suspension are molded with very nice weld and nut details. The full torsion bar suspension is very detailed, but unfortunately most of it will be hidden. The final drive is part R1 with two drain plugs that need to be added, but the instruction incorrectly labels it as A3. I also glued these to the hull and not to the sprocket as instructed, since I like leaving the running gear off until after painting. Be extra careful when installing parts B13 and B14, the front part of the front sprocket mount. These did not fit well and will cause gaps later when adding the front glacis plate. I used stretched sprue to make weld beads to fill these gaps.
The rear hull assembles well, except the instructions forget to have you install part B27, the stop light. Also the instruction have you build the tow shackles one way, then they are reversed when installed, parts E1 and E2. After some research, I used the round rear convoy light, parts J4 and G8. The instruction says to use the older flat, four light design but, by December 1943, the Germans were using the round lights. Another historical inaccuracy is that zimmerit should really be on this vehicle, but is not included in the kit.
Moving on to the interior, we get nicely detailed gun assembly and radios. The rest of the interior is kind of sparse, but not much can be seen through the two hatches. A problem with the gun is that the barrel is not long enough to fit in the breach when you add the pig snout mantle. I added a half round plastic piece to extend the breachs locator hole for the barrel.
If you wanted to detail the interior, there are many aftermarket kits available and the roof can be left loose quite easily. I left the roof separate to add the periscopes, commanders sight, and gun sight after painting. The periscopes, drivers vision block, and gun sight are molded in clear plastic. There is a gap in the rear interior bulkhead where the floor meets the superstructure, but it is not noticeable through the hatches.
The engine hatches come with interior details and handles, which is nice if using an aftermarket engine. The spare road wheel mounts show one way to glue to the engine hatch, but it is upside down when the instructions have you attach this assembly to the engine deck. This is not a big problem, since the spare road wheels will cover most of the mount. The mounting pins for the cleaning rod assembly do not match up with the holes in the engine deck, so I just trimmed them off and flush-mounted it.
The magic tracks assemble nicely with just two small injector pin marks on the inside. The instructions call for 98 links, but I found 95 gives me a nice, realistic sag. I left the fenders and return rollers off until the tracks were assembled. There is not much room to work with the tracks with the fenders on. The tools have great detail and wing nuts that can be attached to the exposed bolts. I found these way too small to handle, so I omitted them.
There are six tabs on the hull that need to be removed for the engine deck and superstructure to fit correctly. This is not pointed out in the instructions. Watch mounting the fire extinguisher on the fender, it can interfere later with the schurtzen mounts. I temporarily mounted the schurtzen to help line up their mounts on the fenders, but then removed them for ease of painting. The instructions are not too clear, but schurtzen part MA4 should be glued to the top of MA2.
At the end of construction, I had about 15 parts that are not marked as unused on the instructions. I doubled checked all the assembly steps and verified they are not used. Perhaps Dragon needs to spend more time proofreading their instruction sheets, since I seem to have these mismarked parts problems on every Dragon kit I have built.
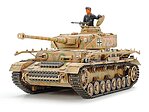
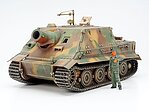
I painted in dark yellow with red-brown and khaki green camouflage. The instructions show this camouflage and two winter whitewashed paint schemes. The decals went down great with just a bit of setting solution needed. They are very thin and do not have a lot of excess clear carrier film.
)