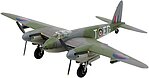
Just recently completed this model and had a blast building it. Overall the fit was pretty good with just a minimum of filler being required along the fuselage joint line. Revell did a little out of the box thinking on this one when they molded the nose section in clear plastic. I handled this by masking off the windows on the inside of the two halves of the nose section and then spraying the entire interior of the nose in the appropriate shade of green. Once joined it looked a bit different but it looked good on the finished model.
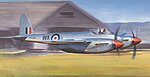
A nice touch is the inclusion of exterior window masks with the kit. Two thumbs up for this move. More companies should consider this as a standard feature. As always, read through the instructions before you begin. You will want to change up the assembly order in order to keep small bits from being broken off or to allow for ease of painting. I assembled and painted the entire tail unit before assembling it to the fuselage. There are some complex curves to mask around for painting in this area. The tail unit was a snug fit and actually, on my example I had to trim away some of the fuselage to get the tail to fit.
Two squadron markings are included on a pretty basic decal sheet, one RAF and one RAAF. Colour scheme for both aircraft is identical. Aftermarket decals are available for Venturas but watch your different versions if being accurate is important to you. Weighted tires would have been nice but again, these are available in the aftermarket product industry. Options in open or closed bomb bay and a load of bombs are included if you choose to model your kit with the doors open. I spent around 40 hours pautting my kit together and overall I would give this model, considering price and manufacturer a solid 7.5 out of 10.
Jeff
)