Dragon 1/35 Tiger I kit # 6383.
HISTORY OF DRAGONS TIGER I KITS.
Dragon makes some very good Tiger I kits. There are quite a few boxings of this formidable heavyweight. Dragon sometimes releases their Tiger Kits under the Cyber-Hobby and Platz labels. Generally speaking, these Tiger kits are of very high quality and many come with some nice multimedia parts. The weakest part of all these kits is the busy, hard to follow, easy to miss pieces instructions. The current line of Dragon Tiger I kits started with the Tiger I Initial Production PzAbt 502 Leningrad, Kit #6252 in 2005. I have had the pleasure of building this kit. When I saw it I balked at the price tag, but decided to go ahead and give it a try. See my review for that kit here on HobbyLinc. That premier of the new Dragon Tiger kit was packed full of bonus parts. For instance, you get an aluminum barrel, turned brass shells and casings, preformed wires, a bucket, Magic Tracks, a lot of PE, shell casing bottoms, two figures, crew clothing, and a 88mm ammo box. It also had a one piece turret. Later in 2005 a Late Production Tiger Late Production 3 in 1 kit #6253 was released. It had new parts for a Late Production tank and markings for 3 different tanks. It had new parts for a Late Production tank and markings for 3 different tanks. The next two releases were from Cyber-Hobby. The first was in 2005. It offered decals for three options in North Africa around 1942 to 1943. It was kit #6286. But Cyber-Hobby also has a different numbering system. The CH (Cyber-Hobby) designation was kit #01. The second release was in 2006. It was an Early Production Michael Wittmann Operation Zitadelle kit from around July 1943. That was kit #6350 with the CH designation #12. You can see my review for that kit on HobbyLinc. The next boxings were both Dragon releases in 2007. The first was a Late Production 3 in 1, kit #6253; the second kit, #6416 was also a Late Production Tiger with new decals. Kit 6253 (see my review for that kit.) had some new parts and decals for 6 different tanks. It has the two G Sprues containing the steel road wheels. Kit #6416 was the Gefreiter Alfred Kurzmaul boxing. It had markings for one tank belonging to Panzer Abteilung 503. Alfred Kurzmaul was the driver of that tank. 2008 saw the release of a Dragon kit #6383, a Late Production Tiger with molded on Zimmerit (This kit is the subject of this review.) It had a box stuffed full of parts with some nice extras. The second kit release in 2008 was #6335, CH #03. It was the first Gruppe Fehrmann offering (see my review for that kit.) Tanks belonging to the Fehrman Group were unique mixes of early and late tiger parts. There were no Tiger I kits released 2009. But 2010 was a busy year with the release of three kits. The first being Dragon kit #6600, an Initial Production Tiger. It has the two E Sprues unique to Initial Production and Early production Tigers. There are and 3 decal options, two of them whitewashed. That was followed by two Cyber-Hobby kits. The first one being Wittmann's Last Tiger Befehlspanzer (command tank) Late Production Normandy, 1944 kit #6610. In The Cyber-Hobby numbering system it is kit #48. It has a decal option for only one tank. The next release was the Cyber-Hobby Sd.Kfz.181 Pz.Kpfw VI Ausf.E Tiger Mid Production which was kit #6660, or CH #61. This is a command version tank with the extra antennas. It has 4 decal options. 2011 saw the release of Cyber-Hobby Tiger with a February 1944 Production date, which appears to be one of the first of the Late Production Tigers. It is Kit #6650, or Cyber-Hobby #67 and it has 5 decal options. Cyber-Hobbys 2012 release was a Battle of Malonovka, Mid Production Otto Carius Edition. It has the T Sprue containing Zimmerit and is kit #6763, CH kit #74. In 2013, Cyber-Hobby came out with another Early Production Tiger. It was the LAH, Operation Citadel, July, 1943, Kit #9142, CH #42. It has two decal options. That kit was the last release from Cyber-Hobby. From 2014 through 2020 all the releases were labeled under the Dragon or Platz Banner. The next kit released was in 2014. It was a Tiger Hull with a Panther turret. That was kit #6683, and it was followed by kit #6700. Kit #6700 is a Mid Production Tiger with Zimmerit (see my review for that kit.) It has 9 decal options and rubber wheels. 2015 saw another Initial Production Tiger. This was a Smart Kit #6608 and is a Tunisian Edition with four decal options. Wittmans Early Production kit #6730 also came out that year. It includes Wittmans 5 man crew to match a famous photo. It has two decal options. Then Tiger 131 Tunisia Early Production, kit # 6820 was released. 2016 saw a re-release of kit #6253 and a Bergepanzer #6850. The Berganpanzer is a Mid Production with Zimmerit. It was released under both the Dragon and Platz names. 2017 was a busy year for Dragon with releases of four Tiger variants. Those kits were a Pz.Kpfw.VI (7.5cm) Ausf B which is a Tiger Hull and a Panther Turret, kit #6868. Next to be released was kit #6624. It is another Mid Production Tiger with Zimmerit. It has two decal options for the Ukraine and another for the Eastern Front. The third and fourth releases for 2017 were a Bergepanzer Demolition Charge Layer with a Borgward Heavy Demolition Charge, kit #6865. The next was a Bergepanzer with Zimmerit and a Demolition Charge Layer with a Borgward Heavy Demolition Charge, kit #6866. In 2018, an Early Production Dragon-Platz kit with 5 decal options for das Reich was released as kit #30TH-07. Wittmans Last Tiger, kit #6800, and an Early Production Tiger named TIKI, kit #6800 were also released in 2018. Kit #6800 is a 2 in 1 kit with a bonus Wittman Figure. It has 6 decal options, all of them in Normandy in 1944. The TIKI kit is an early Production Battle of Kursk release. It has four Das Reich decal options. 2019 saw the release of three more Tigers with new parts. Kit #6624SP was a Mid Production with Zimmerit just like the previous release of that kit, but this one has Detail Up parts. Kit #6888 was another Battle of Malonovka Mid Production Otto Carius Edition. Kit #6947 was a Late Production with Zimmerit from the battle for Normandy with the Tiger Ace Crew. In 2020 kit #6328 and kit #6950SP were released. Kit #6328 is an Early Production, Operation Ochsenkopf boxing. Operation Ochsenkopf was a battle that took place in Tunisia. Kit #6950SP is an Early Production, Battle of Kharkov Edition. In 2021 there will be another Gruppe Fehrman #6484 released. As you can see, there have been quite a few boxings of the Tiger I. Dragon has a lot of experience putting out Tiger I kits. Almost every kit has new parts or decals, but the basic kit remains much the same.
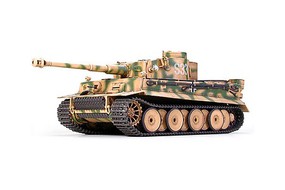
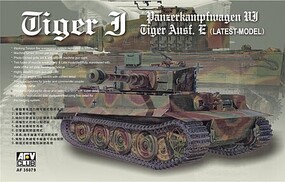
This is a review of kit #6383. The box top is fantastic and shows a Tiger moving through the mist with a Russian tank with a broken track in its wake. The rest of the box art shows what is in the kit. Dragon does a wonderful job of promoting their kits by providing diagrams of kit highlights. You can look at the box and compare it to other kits until you find what you want. The parts are molded very accurately in a medium gray plastic. The moldings are extremely detailed and there is no flash or mold parting lines. The knock-out-pin marks are located in areas where they will not show. This is a Late Production kit with Zimmerit. Late Production Tigers are also known as a Steel Wheels Version. What this means is you can make any Tiger I tank made after about February 1944. One thing to note is that these later Tigers all had Zimmerit. You get decals for six different options; 2./s.SS-Pz.Abt.102, Normandy France 1944, Tank #134, 2./s.SS-Pz.Abt.102, Normandy France 1944 Tank #221, 9./s.SS-Rgt.3, SS-3Pz.Div. Totenkopf, Poland, 1944, Tank #933, 2./s.SS-Pz.Abt.102, Normandy France 1944, Tank #242, 1./s.SS-Pz.Abt.101, Normandy 1944, Tank #112, s.Pz.Abt.508, Italy 1944, Tank #123.
WHAT YOU GET
This kit has a lot of parts, but I am not going to count all the parts on all the sprues. Instead I will give a list of the different sprues. The A Sprue has some parts for the main gun. There are a few parts on this sprue that are for earlier versions of the Tiger and are not used for this build. Sprue B mainly contains the Final Drive and Idler Sprocket that are not used on this version. All the parts on the C Sprue are used except for the two outer Drive Sprockets. What is used on this sprue are the miscellaneous parts for the outside of the tank. The D Sprue contains mostly small delicate parts for the tank and the Main gun Mantlet. A second D sprue has the outside armor with the Zimmerit. The turret with Zimmerit is also considered a D sprue part even though it is not attached to any sprue. Parts on the E Sprue consist of two types of turret uppers, more gun Mantlets and some hatches. The F Sprue contains mostly parts for the front of the tank. There are two G Sprues that contain the Steel Road Wheels. The four H Sprues contain Suspension parts and individual Tracks. There are Fuel Tanks and Cooling Fans on the J Sprue. Parts for the Upper Hull are on the K Sprue along with some two piece grills. It should be noted four of the Grills are molded as part of the upper hull. If you plan to display your tank with the Cooling Grill open, you will need to cut them loose. The P Sprue has armor for the hull that will not be used, along with some molded tow cables. There is a very small R sprue that has a turret basket and some small miscellaneous parts. There is a TA, TB, TC, TD and a TE sprue. The TA sprue has Pioneer Tools. The TB sprue has some of the Tank Recovery tools. The TC and TD sprues have the ends for the four twisted metal cables. The TE sprue has locks for Turret Basket. There are also two sprues for the clear parts. This kit also contains decals, PE, Metal Cables, a jack, and two Commanders Cupolas. Some of these sprues are from earlier releases of the Dragon Tiger and will probably be found in later Releases. That is why you will end up with several leftover parts for the parts box. If you have built a Dragon Tiger I tank before, most of these sprues will be very familiar to you. You also get a set of DS tracks. In theory these tracks are useful. But in this Dragon Tiger kit, the DS tracks crumbled when I opened them up. I imagine there are some angry people out there who have had the same problem on a completed build. I like to use Fruilmodel metal tracks. You get realistic sag and they are easy to work with. Most importantly, you will not need to replace them a year or two down the line. So you really get a lot in this kit. The small parts can be a little hard to work with and easy to break removing them from the sprues. But if you take your time and work carefully, you should end up with a first class build. Would I recommend this kit? Yes, but only for an experienced modeler.
THE BUILD
The build is straight forward if you pay attention to the instructions, even if you build out of order. The first Dragon Tank I built had me dazed and confused because of the jam-packed instructions. After that I decided to make a copy of the instructions, and highlight each piece as I glue it. That allows me to see if I missed any pieces. It is a lot less confusing that way. If I am going to add any extra aftermarket pieces I can make notations for adding them in the correct steps. This kit does not really need much in the way of aftermarket add-ons. It has plenty of PE that will enhance the build. It also does not need any Zimmerit since it is a Tiger with molded on Zimmerit. It does not have an aluminum barrel. It does have DS Tracks which I really dislike. So I will only be adding an Aluminum Barrel and the Fruilmodel tracks to this one. The assembly begins with the Drive Sprockets, Idler Wheels, and the Road Wheels. You might want to go ahead and paint the road wheels and the lower part of the lower hull (where the road wheels will be), the Road Wheel Arms, the Drive Sprockets and the Idler Wheels before you move to the next step. In the second step you will be putting the torsion bars into the lower hull. If you are real careful with this step the torsion bars will actually be workable. That means nothing if you are going to display the tank on a flat surface. But if you are going to pose the tank on an uneven surface, working torsion bars are a necessity. The third step has you attaching most of the Road Wheels, Drive Sprockets and Idler Wheels. The second page has steps 4 through 6. In these steps you will attach the remaining Road Wheels and start building the Lower Hull. There are many sub-assemblies to make items such as the Exhausts, Tow Pintels, Jack, Fuel Tanks and Rear Fenders. The instructions will have you attach these assemblies as you make them, but is best to build and paint all the sub-assemblies, and not attach any of these assemblies until the end of the build to prevent breaking delicate parts. Page 3 Steps 8 through 11 concerns the assembly of the Upper Hull. Again there are a lot of small delicate parts here, like the PE parts. You need to have a good plan when it comes to painting and attaching the small PE parts. Again you might not want to attach the subassemblies until later. You might also think about a good pair of magnifying glasses when working with the PE. Page 4 has steps 12, 13, and 14. This is where you attach the Upper Hull Plate to the Lower Hull and build the Main Gun. I would like to mention the main gun has a spring to allow it to Recoil. This is a toy like gimmick. I would prefer Dragon to lose the recoil and in its place add a turned aluminum gun barrel in their kits. Real modelers do not care about recoiling gun barrels and this kit is too delicate and expensive for a kids toy. Moving to page 5, you will you building and attaching the finished Main Gun. Dragon has a very nice one piece turret in this kit. You get some minimal interior parts and you can see through the openings. The color I have found to be a best match to the interior is called Ivory. HobbyLinc has many brands of ivory paint, so be sure to order some with this kit. In step 17 you will add the turret top. Step 19 on page six is where you mate the Turret to the Hull. This is where I add all the sub-assemblies that were too fragile to add earlier. Also, by the time you finish this step, the tank should be painted and decaled. When you are finished adding everything, you can weather it up. Remember a Tiger tank that does not have mud will never look quite right. Would I recommend this kit? Yes, but only for an experienced modeler.
CaptainA


