If you have never built a Tamiya car model, do yourself a favor and get one. If you have never built a large scale Tamiya, build one as soon as you can get one. As good as the 1/24 cars are, the 1/12 cars are better. More details, more room to add details, and of course, more paint and glue. These kits are expensive and it takes a lot to build them. They are not necessarily harder to build, and good engineering on the part of Tamiya make these large kits a fun build, and with the proper skills, they are show stoppers. Mine won first prize in its category at the Louisville Model Show a few years ago. If I remember correctly, it was the only entry in the large scale cars class. But I am proud of it. I might even enter it again this year.
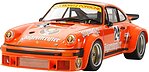
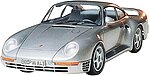
So what sets this large scale model apart from other models? First, it has that Tamiya quality. The sprues are full of accurately detailed parts with no flash and very small mold parting lines. This means very little clean-up of the parts. The parts are engineered to fit well, and they do. The sprues are in different colors. Many of the black pieces are in the exact color as the real cars parts. This means some of the parts do not need to be painted to look realistic. There are a lot of multi-media parts which really adds to the overall realism of the finished kit. For example, Photo-etched parts to reproduce screens, tubing to reproduce fuel and ignition lines, a hard rubber-like material for the whale tail spoiler and much more. It is not cheap to get all these medias engineered to work together in harmony, but Tamiya did it. I remember seeing this kit as a kid and wanted to build it then. I am sure this kit has changed since the 70s, but I still wanted to build it. And now let’s get on to the build.
The instructions are 20 pages long and contain 38 steps. The instructions are well detailed and show where the parts go very clearly. Step one starts the building of the chassis. There is some multi-color painting in this step, .so you will need to mask and spray. You will have the orange paint out, so it is a good time to start painting the body. I used Tamiya TS12 in the spray can. It went on smooth and shiny. Step 2 will have you build the gas, brake and clutch pedal. I think this is actually more detailed than the pedals on my 1/1 scale car. Step 3 is the attaching of the emergency brake, gear shifter, and other parts to the tunnel. Step 4 has you attaching the assemblies from steps 2 and 3 to the chassis. In step 5 and 6 you will be building the steering linkage with some of the rubber parts, and attaching it to the chassis. In step 7 the front brakes are built. Step 8 is the finishing of the front suspension. Steps 9 and 10 you will be building and attaching the rear suspension. Multi-media parts are used in these steps as well. In steps 11 through 17 the engine is built. This engine is highly detailed and looks great with careful painting and all the multi-media pieces in place. The engine is the heart of this kit as it was in the real car. You can see quite a bit of the engine in the finished model. So take your time on the engine and it will look great. In step 18 you will attach the engine to the chassis. In steps 19 and 20, you will be adding more engine bits and pieces. Now we come to the dash board and steering wheel. The dashboard has some very nice decals and the steering wheel has some very intricate linkages. You must be careful with the glue in step 21 or the linkages will not steer the front wheels. The steerable front wheels are kind of gimmicky and is prone to being broken. But again, good engineering is very evident here. Under the front hood are some of the tanks and other parts that really add to the detailing of this kit. The oil tank, oil lines, and some other parts are added in step 22. The fire extinguisher, radiators and heater are constructed in step 23. Those assemblies and a few other pieces are added in step 24. In step 25 you will be making the multi-media seat belts which are attached to the seats in step 26. The most prominent parts under the hood is the gas tank, which is molded in a greenish gray clear color and really looks the part. The .gas tank, seats, and some of the cooling lines are attached in step 27. In step 28 you build and attach the roll cage. The seatbelts attach to the roll cage and might be a little difficult for anyone with fat fumble fingers like mine. But they do go in there. Now we switch our attention to the body of the car. You will be adding lights, the whale tail, windows, the hood and doors in steps 29 through 35. The last few steps complete this build. If I were to build this car again with hopes of improving the results, I think the only thing I could realistically do would be adding some lights.
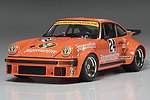
Yes, this is a really big car when completed. But what you lose in display space, you gain in shear detail. The complexity of the build and the price means this is probably not a good kit for beginners. This is also a kit that will take at least a few weeks to build. So if you want a weekend kit, you will need to look at something different. This kit also has a lot of multi-media parts. If you are comfortable with all these, then you will love the kit. As for me, I like Porsches and Jägermeister, so my whole world came together on this kit. It was definitely worth the time and effort. The molding, sprue colors, multi-media, detail, and superior engineering in this kit are all unbelievably amazing. This kit really has no negatives other than a high price. Would I recommend this kit to a friend? If that friend had at least average modeling skills, then yes. Beginners who have this kit may want to leave in the stash until they have a few builds under their belt.
)