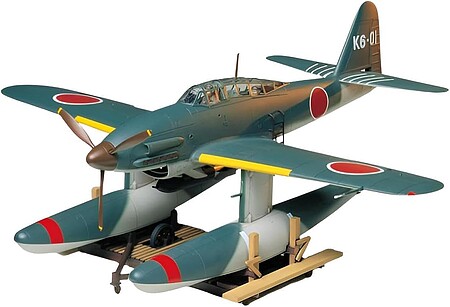
The Tamiya 1/48 Aichi M6A1 Seiran Attack Floatplane, kit #61054 was initially released in 1997. I was compelled to build this kit because of the aircraft's interesting history and unique ability to be launched from a surfaced I-400 class IJN (i.e. Imperial Japanese Navy) submarine. Despite its age it remains an excellent value kit with a reasonable price point. The parts fit was excellent except for the main clear canopy part which required careful fitting and the use of Microscale Micro Krystal Klear adhesive to attach this part to the fuselage of the aircraft model. The kit includes two seated pilot figures and a metal counterweight that is installed in one of the float pontoons. The builder has the option of installing an external bomb sight tube or installing an internal bomb sight inside the canopy behind the windscreen of the aircraft. There are also two differently shaped propellor noses to select from. The instructions show only one paint scheme with different tail numbers to select from. The kit's instructions are in a fold out sheet format, which can be somewhat unwieldly on the workbench. However, the instructions as presented were easy to follow, although I deviated from the order of the assembly somewhat to facilitate painting of the canopy, wings, fuselage and the float pontoons for this build. As with other aircraft builds this kit starts out with building up the cockpit subassembly. I was surprised to find out that the interior surfaces of the cockpit areas were to be painted XF-22 RLM Grey instead of interior green. As I did not have XF-22 RLM Grey, I used Vallejo Model Color 70.869 Basalt Grey with 2-3 drops of flat black mixed in. Most of the paint during this build was applied using an Iwata HP-C airbrush with a 0.3 mm needle at about 20 psi. The instructions direct the builder to paint specific dial gauges flat black and then apply the kit's instrument panel decals over the control panel molded parts. As these decals were thick, several applications of Micro Sol decal solution were applied in this stage of the build. As the decals conformed to the shape of the round dial gauges, care must be taken to ensure that the decal is lined up properly to that the dials on the decals settle over the molded control panel gauge detail. Once the instrument panels had settled into position properly, I applied Johnson's floor wax (i.e. Future) over the decals to secure them into place. As per my usual preference, I detail painted the seated pilot figures and installed them into the cockpit. It should be noted here that should the seated pilot figures not be used, then the kit includes seatbelt/harness decals. The kit also includes the 12.7mm type 2 flex mounted machine gun in the rear cockpit compartment. Unfortunately, the machine gun will be tucked away in the rear compartment and covered by the closed rear clear canopy part. Following painting and assembly of the canopy parts, the instructions direct the builder to sandwich the cockpit assembly between the fuselage halves of the aircraft. External engine exhaust pipes are also installed in this step. In the next step, the builder is directed to build up and install the radiator fairing assembly and install it on the fuselage. I prepainted the internal surfaces of this part using Vallejo Model Color 70.971 Light Green Grey. I painted the air intake grill surfaces of part C13 with Vallejo Model Air 71.062 Aluminium. Step 5 of the instructions covers the main wing assembly and Step 6 involves attaching the main wing assembly to the fuselage as well as the rear horizontal tail planes and the bomb clamps which are painted flat black. Step 7 covers installation of the main wing flaps, the builder has the option of building the flaps in an up or down position. I prefer to install flaps in the down position, if given the option, to increase visual interest in the model. Step 8 covers assembly of the 800 Kg bomb which was painted with Vallejo Model Color 70.869 Basalt Grey. I held off on installation of the bomb for painting purposes. This step also covers assembly of the aircraft floats. The builder is instructed to install the metal weight inside one of these floats. I also did not install the floats as instructed here to facilitate painting. Step 9 covers installation of the floats and bomb on the aircraft. Step 10 addresses propeller assembly, wind screen installation, canopy installation, ladder and pitot tube installation. During propeller assembly, remember to install a polycap inside of it. As the wind screen and canopy are of the complex Green House type, an aftermarket precut canopy mask set is highly recommended. I used the Dead Design Canopy Mask Set VM48 026 for the Tamiya M6A1 Seiran. The ladder and the propeller were painted using Vallejo Model Color 70.985 Hull Red. Step 11 and 12 cover assembly of the aircraft dolly. The dolly's color is Hull Red and Flat Earth. The support pads are flat black and the edges of the roller wheels were painted in Apple Barrel 21490 E Pavement. For the exterior surfaces of the wings and fuselage, I initially primered the entire model in flat black acrylic paint. I then painted the panel centers of these surfaces with Apple Barrel Acrylic Snow White. To stabilize these subcoats of paint I sealed them in a coat of Future. This was followed by a water-resistant coat of acrylic matte clear from a spray can. Once these coats had cured, I could proceed with masking the floats and the aircraft model with Tamiya Masking Tape. For the topcoat of the upper aircraft surfaces, I used Vallejo Model Air 71.310 IJN Deep Dark Green and for the topcoat of the lower aircraft surfaces I used Vallejo Model Air 70.971 Light Green Grey. I painted the aircraft engine exhaust pipes Metallic Gun Metal Grey. For the wing navigation lights I used Model Master Transparent Red and Model Master Transparent Green. These colors were applied using a toothpick. After painting the aircraft model another protective coat of Future was applied followed by the water resistant acrylic matte coat from a spray can. After allowing for drying of these coats, decal installation could proceed. The decals provided with this kit are thick, so copious amounts of Micro Sol and Micro Set were used to apply the decals to this model. Fortunately, the kit provides decals for the yellow identification stripes on the leading edge of the main wings. Following decal installation, another sealing coat of Future was applied followed by the acrylic matte coat. At this point, a pin wash was applied to the recessed panel lines of the aircraft using Tamiya Brown Panel Liner. Excess Tamiya Panel Liner was removed using Testors Enamel Thinner, applied by cotton swabs. Following this stage, canopy masks were removed from the canopy. Then, fragile parts such as the ladder, radio antenna and the pitot tube were installed. An antenna wire was installed using EZ line and Gorilla Superglue. Although entry level model builders with modelling experience could possibly complete this kit, due to the complex canopy masking necessary for successful completion of this kit, it is better suited for intermediate to advanced methodical fine scale model builders with airbrush and decal installation skills.
;)
;)
;)
;)
;)
;)
;)
;)
;)
;)
;)
;)
;)
;)
;)
;)
;)
;)
;)
;)